How To Start Making Maple Syrup
If you’re interested in making your own Maple Syrup you may want to start out small and learn everything you can the first year with minimal cost. I recommend setting your goal at 1 to 2 gallons of syrup, which will require ~80 gallons of sap (40 -1 ratio). What will you need; taps, buckets, evaporator/pans, fire/stove and a planned process, all which we will describe in this article.
Tapping The Trees
The first thing we need to do is tap and collect the sap, so how do we do that. Start by purchasing a few taps (24), a few buckets/pals (10), and a few feet of tubing. Next drill and tap your trees using a battery drill and small hammer. For our first year we gather 100 gallons of sap (10 trees tapped) then pulled our taps. Again we were in the learning stage and set our goal to 1 – 2 gallons of the final product “Maple Syrup”.
Sap Collecting
We started by tapping ten trees, putting in two or three taps per tree. Smaller trees use only one tap and very large trees can have up to 4 taps. We then used our Vinyl Tubing and Tee Connections and fed the tubing into our buckets (drilled hole in lid). In the first week we had plenty of sap to start boiling. You will want to filter your sap before boiling to remove wood, bugs, etc.. and filter the final syrup to remove the sugar sands.
Boiling Down The Sap
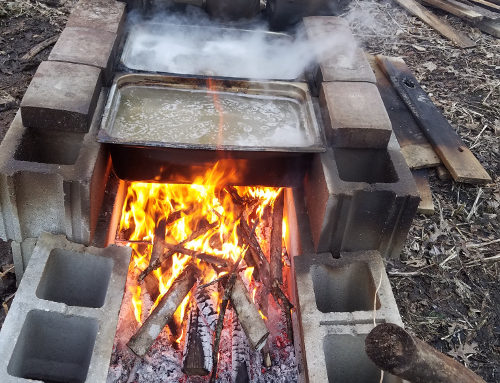
We collected 100 gallons of Sap and boiled off 95% of the water or down to 5 gallons, which gave us a very high concentration of Maple Sugar Sap. The first major boil-off was with our homemade fire pit and evaporator, using dead elm for firewood. The next step was to take the 5 gallons of Sap up to the house and boil that down to 3.5 gallons in a Turkey Cooker. Next we divided those 3.5 gallons into 3 pans to finished our boiling on the stove where we could control the heat and boil to perfection (Maple Syrup).
Fire Pit & Evaporator Boiling
Here you will need to design your own stove and evaporator. We use bricks for the stove and stainless steel pans for the evaporating. In our design we used two pans and six concrete blocks per side (recommend 9 blocks per side and 3 pans). The stainless steel pans are 6” deep and 20” long.
Materials:
Cement Blocks @ $1.05/ea
Stainless Steel Pans @ $30/ea
Turkey Cooker @ $108.99
Tree Taps “Fleet Farm CDL Maxflow 5/16” clear smart spouts (12 PK)” @ $4.29
Tee Connections “Fleet Farm CDL Maxflow 5/16” Tees (12 PK)” @ $5.29
Vinyl Tubing (10 trees 40 ft) @ $0.32/ft.
Ten Buckets with lids @ $3/ea
Filters @ $2/ea
Stages Of Boiling
Stage 1 Fire pit & Evaporator “See pictures, video & design layout”.
Stage 2 Turkey Cooker “See video”
Stage 3 Stove “See Video”
Results “Maple Syrup”
We found that the Maple Syrup was light in color (Amber) for the big leaf Maple Trees and much darker for the other Sugar Maples, as seen in the pictures.
Learnings:
We found once you’re set up and have the initial cost that collecting the sap and boiling it down in the woods is nothing but time spent. So 100 gallons or 1,000 gallons would not of been any more cost other than time and cutting more firewood. We also found out that when burning Elm we only use 30 – 40 logs for our 100 gallons and we had plenty of wood to do 5 times that. It took us 9 hours to boil our 100 gallons down and with 3 pans we may of be able to cut that to 5 hours? We did have great weather for boiling, but a Sugar Shack would help shorten the boiling time even more. We also discovered that making Maple Syrup is easy to do and was much less work than we thought it would be. As for knowing when the syrup was ready we watched for the foaming and color and took it off the stove at that time (did not use a thermometer or barometer). We must of guess correctly each time as the taste and thickness were great/perfect on each batch.


