
The Process Of Making Maple Syrup
Whether you’re a Novice, Expert, or Commercial producer the process for making Maple Syrup is the same. The differences will be in the tools, equipment, and energy efficiency for boiling.
How Do I know When To Tap My Trees
Before you start to tap trees the outdoor temperatures need to get above freezing during the day.
Once you start to see these warmer temperatures begin by only drilling and tapping a couple of spiles (spouts) and hang buckets on them. Use these taps to monitor the sap flow and when it’s consistent drill and tap all your trees. The Maple Syrup seasons typically begins around Mid-February and as long as the nights get below freezing and the days above the Sap will run. On warmer days the Sap will flow, so watch your buckets as they will overflow.
The Maple Syrup season is over once the temperature remains above freezing or buds start to form on the tree. If you continue to draw sap at this time it will produce bitter syrup and puts unwanted stress on your trees. In the Midwest the end of the Maple Syrup season is typically the last week of March.
How To Tap Your Trees For Collecting Sap
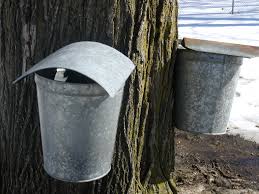
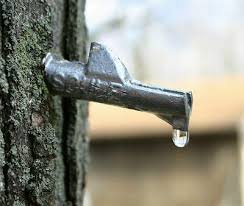
Use a cordless drill and drill your holes at the same diameter as your spouts. Make the holes approximately 3 inches deep at an upward angle, leaving the exposed spout angling downward towards the ground. Tap your spouts into the holes firmly with a hammer, but not to far as you want to avoid splitting the wood around your spout and losing sap. Next hang your buckets or attach your tubing. If using buckets try to keep a cover/lid on them to minimize any foreign material, snow, or water from getting in.
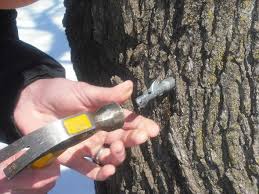

If your trees were tapped last year then move the tap hole at least two inches to the side and twelve inches above or below the previous hole. When done tapping remove all spouts (spiles) from the tree and do not plug your holes. By leaving taps and plugging the holes you can cause more harm to the tree. Tap holes will close or heal on their own within a year or two.
*Taps should be placed between two to four feet off the ground.
How Many Taps Can I Put In A Tree
A rule of thumb for the number of taps per tree is;
12 – 14 inch Dia (1 Tap)
15 – 19 inch Dia (2 Taps)
20 – 24 inch Dia (3 Taps)
25 Inch Dia or larger (4 Taps)
What Trees Can Be Tapped For Making Syrup
Maple syrup can be made from any species of maple tree; sugar, black, red and silver. Syrup can also be made from the Box Elder tree. The Sugar Maple is the best, as it contains the highest concentration of sugar.
*Trees should be at least twelve inches in diameter for tapping.
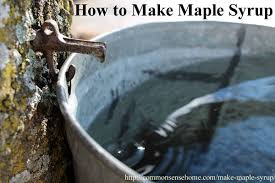
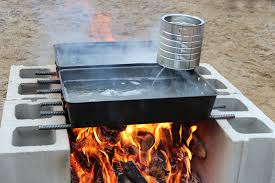
Plan For How You Will Boil The Sap
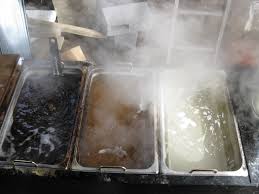
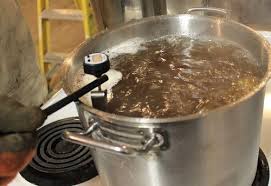
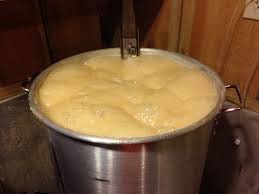
Pour your sap into a large cooking pan and bring to a boil. As the water boils off, add more sap. Take care to add only small amounts of sap to avoid killing the boil. When the sap darkens, produces smaller bubbles, and runs off a wooden spoon in a sheet (not drops) pour it into a smaller pan and boil under a better heat control (stove or turkey fryer work great). Test your syrup by taste, temperature (~ 219 F, Candy Thermometer), or a hydrometer. As the sugar in the sap becomes more concentrated the temperature of the boiling sap will rise above the water boiling temperature of 212 F.
*It is recommended that you have at least ten gallons of sap before you start the evaporating process.
How To Store Tree Sap
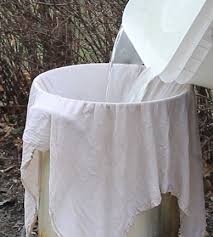
Sap is perishable and will spoil, so you need to keep it out of the sun and below 38 degrees Fahrenheit. Ideally you want to boil your sap every day if possible. If you need to collect and store sap use this as a guide; If storing sap outside in the snow use within 3 days, if you need to store longer consider using refrigeration (store sap up to 7 days), for longer storage periods consider freezing the sap. *Before boiling, pour your sap through a filter ( wool, cheesecloth, or synthetic) removing foreign material such as bugs and bark.
How Long Do You Need To Boil Sap
There are many arguments on boiling sap until it reaches seven degrees above the boiling point of water, at your elevation. Some even say to boil water first to get the correct temperature. However, this is not as easy as it sounds and I would not recommend using this as your gauge. A better process, at least for the novice is to boil until the sap aprons or runs off a wooden spoon in a sheet and then to check with a hydrometer. To avoid over boiling try removing the heat source when you think you’re close and test. If the syrup is not rich enough boil it more. When you have completed boiling down your Maple Sap you need to filter the hot syrup through a clean wool, cheesecloth, or synthetic syrup filter. This will remove the niter (colorless to white crystallizing mineral) or sugar sand, leaving your maple Syrup clear and smooth.

*When boiling Sap it will foam up and can easily boil over the sides of your pan By rubbing butter around the rim of the pan you can avoid this from happening.
Heat Sources
The process to boil (evaporating water) Maple Sap down to Syrup takes time (several hours) and can be costly. It is recommend to use wood as a primary heat source as it’s typically free or cheap compared to electric or gas. Once you have boiled your sap down to 80% then switch to a controlled gas source. Large producers will use pits, sugar shacks, and efficient heating systems with evaporators.
Tools Needed For Collecting Tree Sap
For a small Maple Syrup Operation you will need;
– Drill with a bit the same size as your spouts (7/16″ or 3/8″)
– Hammer to tap in your spouts (spiles).
– Tree Spiles (Spouts)
– Buckets for catching Sap
– Large boiling pan (preferably low and broad. A large surface area will increase the rate of evaporation during the boiling process )
– Smaller finishing pan to complete the boiling process.
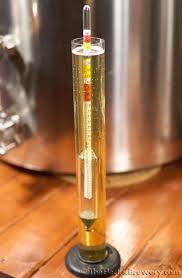
– Candy thermometer and Hydrometer
– Filters (Wool, Cheesecloth, or synthetic)
– Wooden spoon
*A hydrometer is an instrument used to measure the density relative to water of a liquid. The
density of maple syrup is measured in Baumé degrees and fluctuates with temperature, so it important to know the temperature of your syrup when testing. Hydrometer also contain a Brix scale, which measures the sugar content of a liquid.
Candy Thermometer and Hydrometer

What Is The Ratio Of Sap To Syrup
The ratio of sap to syrup for the sugar maple is ~30 to 1 (30 gallons of sap yields one gallon of syrup). However, here are the variables you need to consider in determining the best ratio for your taste.
The Maple flavor (richness) improves with boiling, but be careful not to boil to long, otherwise you will end up with all sugar. A safe procedure for final boiling is to boil multiple times until your Maple Syrup meets your taste expectations. Too little boiling and your Maple Syrup will be to runny, almost like water. This is why many home producers or novice boil the same batch multiple times before finishing and producing a Maple Syrup of perfection.
As the season gets late there will be less sugar in the sap, so you will need a higher ratio (up to 60 to 1). The ratio of sap to syrup will also increase if tapping those trees mentioned above, versus the Sugar Maple.
Why Are There Different Colors Of Maple Syrup
At the beginning of the maple syrup season the temperatures are the coldest and the sap is very transparent in color with about 2% sugar content (sucrose sugar). As the outside temperatures get warmer the heat enables microorganisms (bacteria) within the environment to grow, which creates a dark maple color. Although the sap is sterile within the tree, it is rapidly colonized by a variety of microorganisms upon exiting the tree.
*This is why you should avoid drinking the sap before boiling.
The enzymatic reaction caused by these microorganisms on the sap causes some level of conversion, converting sucrose into invert sugars, glucose, and fructose. As the seasons progresses the level of conversion increases in volume due to increased microorganisms in the warmer environment. This sugar chemical reaction in conjunction with the Carmelization and Mallard processes that occurs when the sap is being boiled causes the syrup to become darker in color.
*The stronger maple flavor occurs as a result of combining the Carmelization (browning) reaction with the Mallard and Bacteria Enzymatic Reactions. Corresponding to color, the darker the syrup the stronger its flavor.

Grades Of Maple Syrup
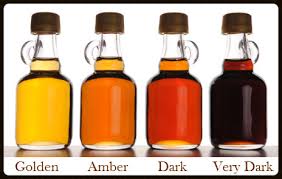
Maple syrup grades have nothing to do with quality or nutrition. Instead, they simply refer to the Syrup’s color, clarity, density, and flavor. There are 5 different color grades of Maple Syrup, which reflect the time of the season the syrup was produced. As the season progresses the color darkens; extra light, light, medium, amber, and dark. Many producers only consider 4 color stages and do not include Grade C, as this is more for candy making.
All Maple Syrups contain the same viscosity (consistency/thickness) levels and have a density of at least 66.5% sugar content.
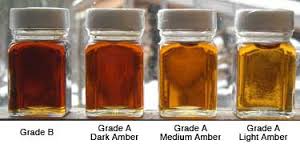
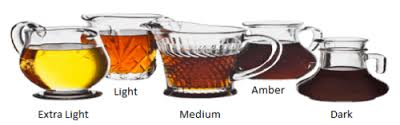
Grade A
This is the first sap of the season to be tapped and boiled, usually in mid to late February. Since there is more sugar and less bacteria during this time in the season, the color is extra light to light.
Grade B
This Maple Syrup is medium to amber in color (darker than Grade A). It will have a more pronounced maple flavor and is the most common for use on pancakes, waffles, and french toast.
Grade C
This is the last Sap to be tapped and requires more boiling (up to a 60 to 1 ratio) due to less sugar content. However the benefit is a Maple Syrup with a more pronounced Maple flavor. This syrup is typically used for candy rather than pancakes, waffles, or french toast.
How Is The Sugar In Tree Sap Produced
Trees store starch in their trunks and roots in preparation for winter. The starch is then converted to sugar. When the temperatures start to get above freezing the tree draws water through these roots, bring the sugar with it. Once most of the water is evaporated off you are left with the concentrated syrup, Maple Syrup!.
