
Trap Preparation
It’s extremely critical to prepare your traps if you want to be a successful fur trapper. There are basically 3 steps in preparing your traps; boiling to removing the oil and scents, dying to remove the shine and help with rust/corrosion, and waxing to improve operation, scent control, freeze up, and further rust protection. When preparing your traps do this in outside and make sure to handle your traps with rubber gloves keeping all human scent off. Also store them outside in a shed that does not have oil, gas, or any other unwanted scents. How offend should you treat your traps? I treat all new traps before using and them and repeat this every 2 to 3 years.

Boiling Your Traps
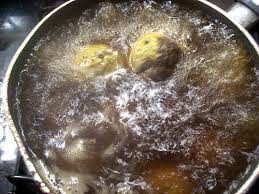
Boiling traps is done with both new and old traps, but let’s focus on new traps. Traps are made from steel and come from the manufacturer with a coat of light oil to keep them from rusting. These traps have also have picked up human and artificial scents along the way, so we need to remove these by boiling them. We also want to add some salt & vinegar; this will help prep your traps for rusting. Yes rust, the very thing we want to avoid, however we need some corrosion so we can get our dye to penetrate the steel better.
When boiling the oils will form on the top of the water, so how do you remove your traps without getting this oil on them? The best way is to add hot water until the oil layer spills over the top and out of your pan, now you can remove your traps. Right after removing your traps pour hot water over them, this will help remove any remaining oils. Next place your traps outside in the ground or lying in some water until they are rusted over slightly. Now you’re ready for the dying process.
Dying Your Traps
In the Mid-West we have a lot of Walnut Trees so I like to use walnut husk for dying. You can find Walnut Trees easily and it’s fun to make your own dye, which may be the best available dye out there. When handling walnuts use rubber gloves as this dye will not come off your hands. What you’re after is the outer shell known as the husk, green or black both will work. I prefer using ones that have just fallen off the tree, before they get pure black.


When dying or waxing your traps place a small nail between the jaws to hold them open, this will help expose the jaw surface areas. Now add enough water to cover the number of traps you want to dye and add your walnut husks. Boil this for 30 minutes, strain out the walnut shells (husk), and add your traps. Boiling new traps may take up to 2 hours, so you may need to add water to keep you traps covered due to your water evaporating. When done your traps will take on a dark or black color, as the natural acid from the walnut shell has created a chemical bond between the dye and your steel traps.
Waxing Your Traps
Waxing your traps will help protect them from odors, corrosion, and freezing, along with crating a faster reaction time, and a lighter trigger force. For the type of wax, I prefer the Paraffin wax over bees wax, as it will coat better and last much longer.

There are two methods for applying wax; adding your wax to boiling water or melting wax for dipping. I prefer using pure wax (paraffin), but you must do it safely, as wax will burn and does have a flash point. This method will take longer and use more wax initially, but less wax is actually used in the end and it gives a better protective coating with a tighter bond.
Melting And Applying Pure Wax Safely
To melt wax safely use a two pan approach, placing one pan on your heat source with water only and the second pan in this water with your wax (enough to cover your traps). Now your wax cannot reach critical temperatures, being controlled by the boiling water (212 degrees F). Again, this process will take longer, but safety must come first.
Once your wax has melted add your traps, making sure they are warm to hot so not to cool the wax too much, increasing your boiling time. Let your traps set in the wax until they are at the same temperature, this may take 3 to 5 minutes. Now take your traps out letting them drip over your wax container for a few seconds, then hang them up.
Most Common Traps
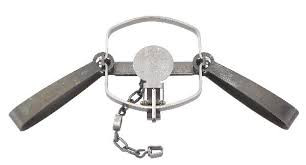
Steel-jaw leg-hold traps (CS Coil Spring and LS Long Spring) are the most common traps used. These traps are triggered by a pan-tension device that is activated when an animal steps on the pan causing the jaws to slam shut.
Here are the CS & LS traps I use:
#1 CS & LS 4” for Muskrat
#1 ½ CS 4.75” for Mink, Raccoon, and Otter
#3 CS 6” for Beaver and Coyote
#5 Long Spring LS 7.5” for Beaver


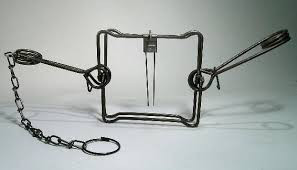
Here are the Conibear (BT Body trap) Traps I use:
#110 BT 4.5” for Mink, Muskrat, and Weasel
#330 BT 10” for Beaver, coyote, and Otter

